How I Built Fred

Or

"There's a Dalek Living in Our Basement!"

I still look at Fred sometimes and tell myself I had to be nuts when I set out to build a Dalek. It was just a matter of the right combination of events; I was living with my parents, wasn't dating anyone, and had a lot of enthusiasm for Doctor Who. (re: I had no life).

At TARDIScon '88

Making Fred was like moonlighting at a second job. I would come home from work, eat dinner, then go down to the folks' basement to work for a few hours. Sometimes, I would get really tired of the amount of work involved or get discouraged by setbacks. The one thing that kept me motivated was thining about the 
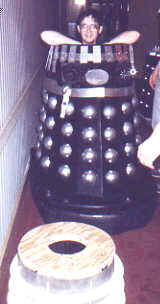
looks of amazement I would get from St. Louis fans when a "real-life" Dalek made an appearance.

If you're thinking of building a Dalek, based on what you'll see here, be sure you realize how much work is involved.  I am by no means saying the way I built mine is the right or only way.  I was using what few skills I had in the way of working with wood, sheet metal and so on.

Except for the few good photo references and books I could find on Daleks, I pretty much had to figure out how to make "Fred" out of the materials I could most easily handle. Perhaps the most valuable information I can hope you might take away from this is to examine my decisions, see where you might be able to improve upon my methods, and avoid some of the mistakes I made.

By the way, if it really makes any difference, I believe all rights and images pertaining to the Daleks are the intellectual property of the estate of the late Terry Nation, and the BBC.  No intention has been made here to infringe upon those rights. This "how I did it" is merely one individual's attempt to pay homage to these creations, and there is no attempt to gain monetarily from this document.

Obviously, when you're trying to recreate any costume (is a Dalek a costume, or a setpiece, by the way?), you need to have lots of photos and/or drawing references. The more angles you can see your subject from, the better off you'll be.  It helps your accuracy tremendously, and can also give you insights into construction.

Back in the 1983-84 time frame, Doctor Who had only been airing in St. Louis for a relatively short time, but fan materials were plentiful, fortunately.  I carefully watched each Dalek show, noting details, bought the fan magazines with Dalek pictures, and read any behind-the-scene features that I could.

Tech Manual cover There had been an article in a British TV magazine back in the Seventies with instructions on building Daleks, but these were for kids, and were highly inaccurate as to dimensions. The best resource I found was the Doctor Who Technical Manual. It had what were close to technical blueprints,alledgedly of a prototype, complete with measurements you could scale up (although, this is not stated). I seem to recall that the scale in the book was not completely accurate for some reason, but the drawings were pretty much spot-on.
One of the most important things that I needed to learn was how tall they actually were. Once I knew that, I could work the proper scale.  Also, I decided to work in metrics, since it was easier to convert.  Despite my having hardly ever used metrics for anything before, it actually helped getting dimensions pretty close.  Somewhere in my research, I learned that the first Daleks were 
4' 9".  Later, their height was increased to 5' 2", so that they'd look a bit more imposing.
The tools I used pretty much all belonged to my father.  If I needed something he didn't have, or I had to replace something I used, I bought them.  Tools included a radial arm saw, a regular radial saw, sabre saw, metal cutting scissors (tin snips), hammer, nails, screwdrivers, and various other bits of hardware.  Much of "Fred" is made of plywood and aluminum sheet metal. There were a couple of items I had custom fabricated.  All told, I estimate that my expenses were in the range of almost $2000, when you factor in the tools, their replacements, gas and wear and tear on my car and materials (especially when I had to buy more when I screwed them up the first time). I also rebuilt the lower two thirds once.  I imagine a Dalek could be built for much less -- this is just what it cost me.

I started out deciding what version of Dalek I wanted to make.  Over the years of the TV show, the originals were rebuilt, replaced or recycled. Consequently, at times, each new set of Daleks in a show had different details from the previous ones. There were also the two Dalek movies made in the '60s, based on the show. These were taller than the first TV show Daleks (they were used in the second TV story appearance, by the way, but never again).  I decided to make one of these for a number of reasons.  First of all, I just liked the look of them, and second, I figured I could probably fit my 6' body into the larger ones more easily.  The Brits who operated the TV show versions were smallish men, so I needed as much room as possible.

Oh no! I made my first big mistake during this stage of design analysis. It was stated somewhere in my research that these larger Daleks were 5' 6". I interpreted this to mean that they'd scaled up the entire design.  I only found out later that all they'd done was build a tall rolling base to put the rest of the Dalek body casing onto in order to get that height.  In the end, though, it just made it that much easier to get inside "Fred". Besides, you couldn't tell the difference unless you had an original on hand to compare with.
Anyway, I resigned myself to the fact that my Dalek (actually, a Dalek Supreme) would not be an exact recreation of any one model when I built Version I.  Since there was no uniformity to the real ones, however, I didn't worry about it too much.  My rationalization was that this was another version that hadn't been seen yet.  To the non-nitpicking fan, my Dalek would still be instantly recognizable for what it was.  Version II came much closer to what I tried to achieve.

Now, on to actual construction of "Fred"......

Back to Workshop

Next

Photo by Michael Pursley